
Test builder
Author tests visually by recording interactions or adding steps manually, then refine them with checks, AI selectors, and hooks.
The test builder is where you design what your test does. Record real interactions from a browser or device, or add steps by hand, then organize them into groups, verify behavior with checks, and tune execution with AI selectors, timeouts, and hooks.
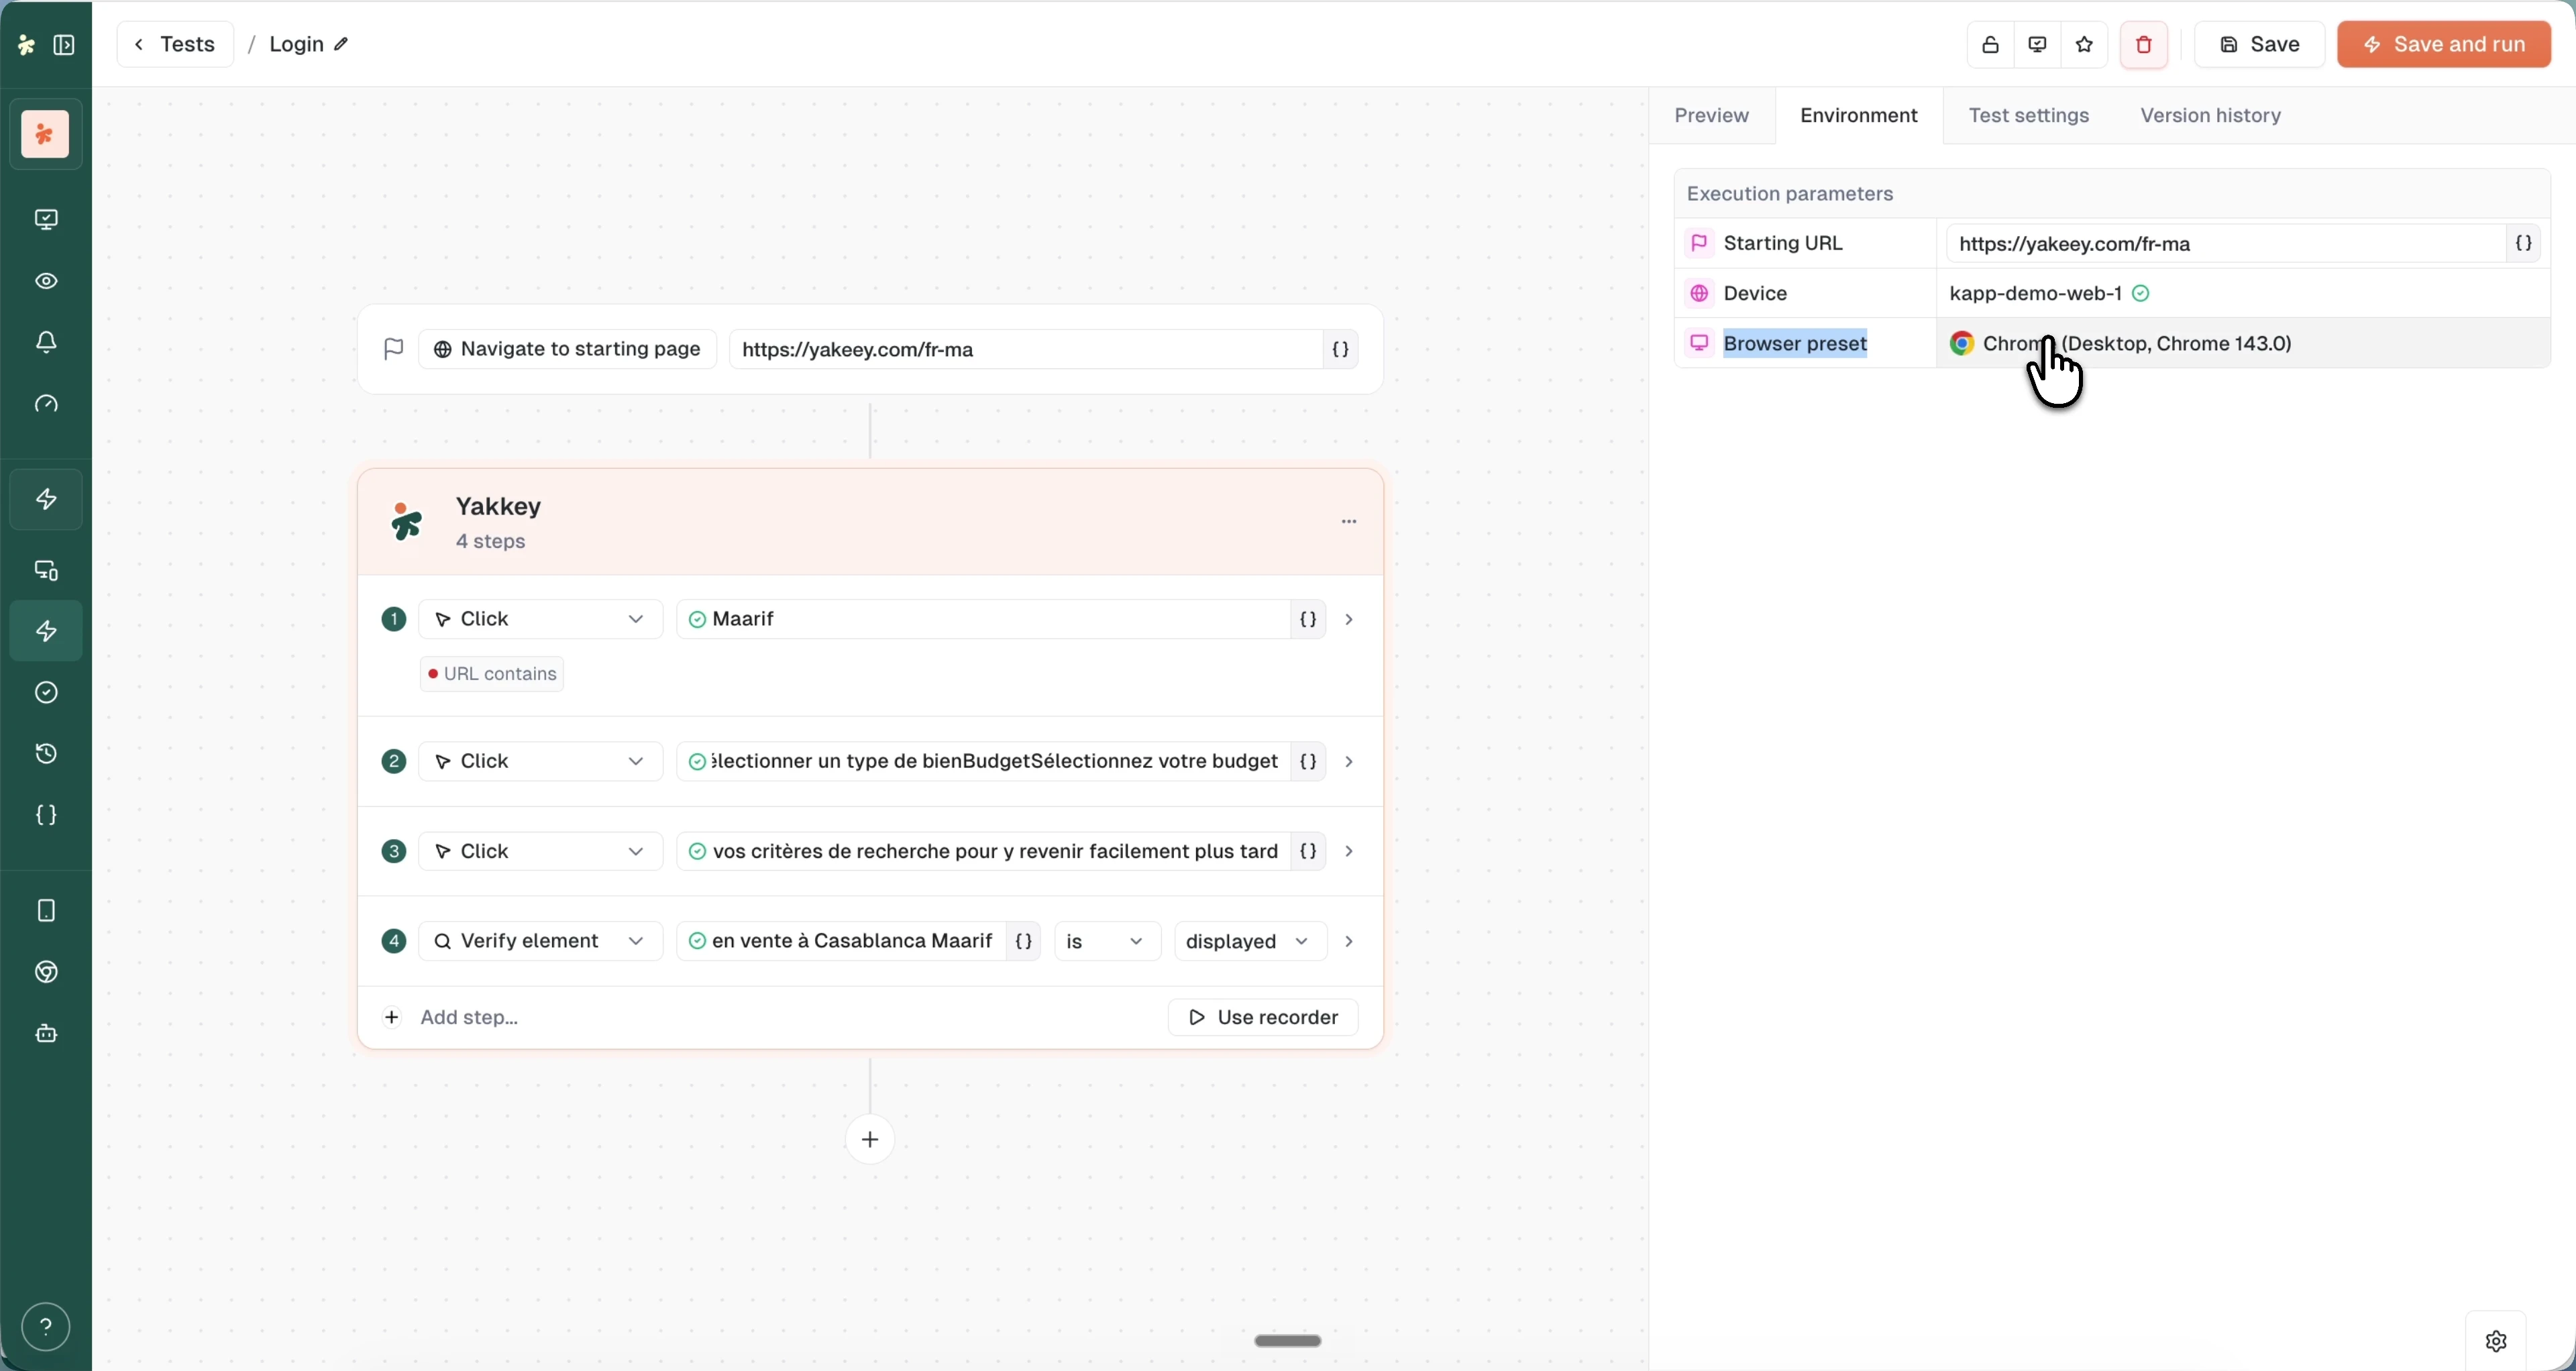
The builder at a glance
The canvas on the left shows your test: the starting point at the top, followed by step groups containing numbered steps. The panel on the right has four tabs:
- Preview: run feedback and screenshots
- Environment: execution parameters (starting URL, device, browser preset)
- Test settings: description, tags, AI, timeouts, and hooks
- Version history: past versions of the test
Selecting a step in the canvas replaces the panel with that step's details.
Starting point
The first block in the canvas defines where the test begins. It depends on the channel:
- Web tests: Navigate to starting page with a URL (e.g.,
https://example.com/login) - Smartphone tests: Launch app with the app you selected at creation
Recording interactions
Recording is the fastest way to build a test: interact with your site or app as a user would, and each action becomes a step.
Web: the Kompagnon extension
Web tests record through Kompagnon, a Chrome extension. The first time you click Use recorder, the builder prompts you to add it to Chrome.
With the extension installed, Use recorder opens your starting URL in a new tab with the recorder widget overlaid.
Browse normally: clicks, inputs, and navigations are captured as steps in real time. When you stop, the recorded steps appear in your step canvas, ready to edit. See the web recorder for the full flow, including the side panel and recording verifications.
Asserting while recording
You can add verifications without leaving the recorder. Click the eye icon in the widget to enter assertion mode, then click any element on the page to verify it.
The assertion is recorded as a step alongside your interactions.
Smartphone: cloud recorder
Smartphone tests record through a cloud-based recorder instead of a browser extension: you drive the real device from your browser and your taps, inputs, and scrolls become steps. See the mobile app recorder for the side-by-side recording flow.
Adding steps manually
Click Add step... at the bottom of a step group to insert a step without recording. A searchable menu organizes the actions by category: Most popular, Interactions, Email & SMS, Verifications, Navigation, Wait for..., and Others. Pick the action, then configure its target and value. See the Actions Library for every available step.
To add a step in the middle of a group rather than at its end, hover between two steps: a + appears on the line that separates them and opens the same menu, inserting the new step right there.
Each step's context menu lets you edit, duplicate, or delete it, and you can drag steps to reorder them.
Step groups
Steps are organized into named groups. Use them to structure your test by flow or feature: a login group, a search group, a checkout group.
The group menu (the ... button in the group header) offers:
- Move up / Move down: change execution order
- Duplicate: copy the group and its steps
- Create reusable component: publish the group to the component library
- Delete: remove the group and its steps
- Add custom capabilities: attach capabilities to the group
Turning a group into a reusable component
Create reusable component saves the group to your product's component library so other tests can use it. The group turns purple to show it's now a shared component. To convert it back to plain steps in this test, use Detach reusable component.
Read more in Reusable components.
Step details
Select any step to open its details panel, organized in three tabs: General, Checks, and Advanced settings.
General
- Selector: how the step finds its target element (XPath or text). The
{}button inserts variables. - Timeout: how long to wait for the element (e.g., 20 seconds)
- AI usage: per-step AI settings (see below)
The panel also shows a Reference screenshot: the page or app state captured at that step during the last run, so you can see exactly what the step targets. It appears for both web and smartphone steps; before a step has run, it reads "No reference screenshot available for this step". Smartphone selectors additionally offer a Selector / Coords toggle to target by element or by coordinates.
Checks
Checks verify that your test behaves as expected at a given step. Add one from the Checks tab and configure:
- Entity: what to check, such as
url,loading_time, orstep_duration - Operator: how to compare (
=,!=,>,<,contains, and more) - Value: the expected result, which can include variables
- Status:
errorfails the test,warninglogs and continues - Logical operator: combine multiple checks with
andoror
Checks can be grouped and nested for complex conditions, for example "(URL contains 'dashboard') AND (loading_time < 2000)". Steps with checks show a tag in the canvas, like URL contains.
Advanced settings
- Ignore error on this step: a failure here doesn't fail the test
- Skip during run: keep the step but don't execute it
- Interval: pause after the step, in milliseconds
- Capabilities: attach custom capabilities to the step
AI selectors
AI helps find elements reliably when selectors are fragile, like on dynamic pages or after UI changes.
Enable Turn on AI for this step in the step's General tab. The selector field gets a gradient border, and you choose a strategy:
- Smart: uses the AI to find the element on the first run or when the saved selector fails, then caches the result to save time
- Always: forces the AI to redetect the target element on every run, ignoring saved selectors
- On demand: AI stays off by default; you enable it manually on each step that needs it
Link to test ties the step to the test-level AI setting instead of a per-step override. The test-level toggle and strategy live in Test settings > AI. For the full picture of what AI does across the platform, see AI in Kapptivate.
Environment
The Environment tab holds the execution parameters:
- Starting URL: where the test begins
- Device: the agent or device the test runs on
- Browser preset: the browser configuration for web tests (e.g., "Chrome (Desktop, Chrome 143.0)"). A new test opens on your default preset. Click it to pick from your saved browser presets.
Test settings
The Test settings tab gathers everything that applies to the whole test:
- Description: optional notes about what the test does
- Tags: labels to organize and filter tests
- AI: the test-level AI toggle and strategy
- Delays & timeouts: Step delay (pause between steps, in seconds) and Selector timeout (max wait for an element, in seconds)
- Hooks: lifecycle step groups (see below)
- Advanced: the test's default execution mode (how much data each run collects), accepting non-secure certificates, custom capabilities, and Reset all selectors
Reset all selectors clears every selector the AI has found and cached in this test, so the next run looks for the elements again. Reach for it after a redesign, when cached selectors point at elements that no longer exist. Steps that come from a reusable component keep their own selectors.
Hooks
Hooks run a reusable component at fixed points in the test lifecycle:
- Before Test: once, before all steps (e.g., a login flow)
- Before Each Step: before every step
- After Each Step: after every step
- After Test: once, after all steps (e.g., logout or cleanup)
Toggle a hook on and the Reusable steps group library opens so you can pick which component runs.
Variables
Click the {} button in any text field (selector, value, URL) to insert a variable: values from previous steps, random generated data, or your configured variables. You can mix literal text and variables in a single field, for example https://example.com/{userId}.
See Variables in tests for the full picker, and Configurations & variables for the product-level variables and groups.
Saving and running
Save stores your changes; Save and run also queues an execution immediately (or press Cmd+Enter / Ctrl+Enter). Undo and redo work with the usual Cmd+Z / Cmd+Shift+Z.
The Version history tab lists previous versions of the test. Open one and click Restore to bring it back.
What's next?
Last updated on