
Navigating Kapptivate
Learn how to navigate Kapptivate's sidebar, switch between Workspaces and Products, and customize the interface to fit your workflow.
The Kapptivate interface is organized around a left sidebar with three sections: Overview, By Product, and Equipment. Learn how to navigate, switch between Workspaces and Products, and customize the interface to your workflow.
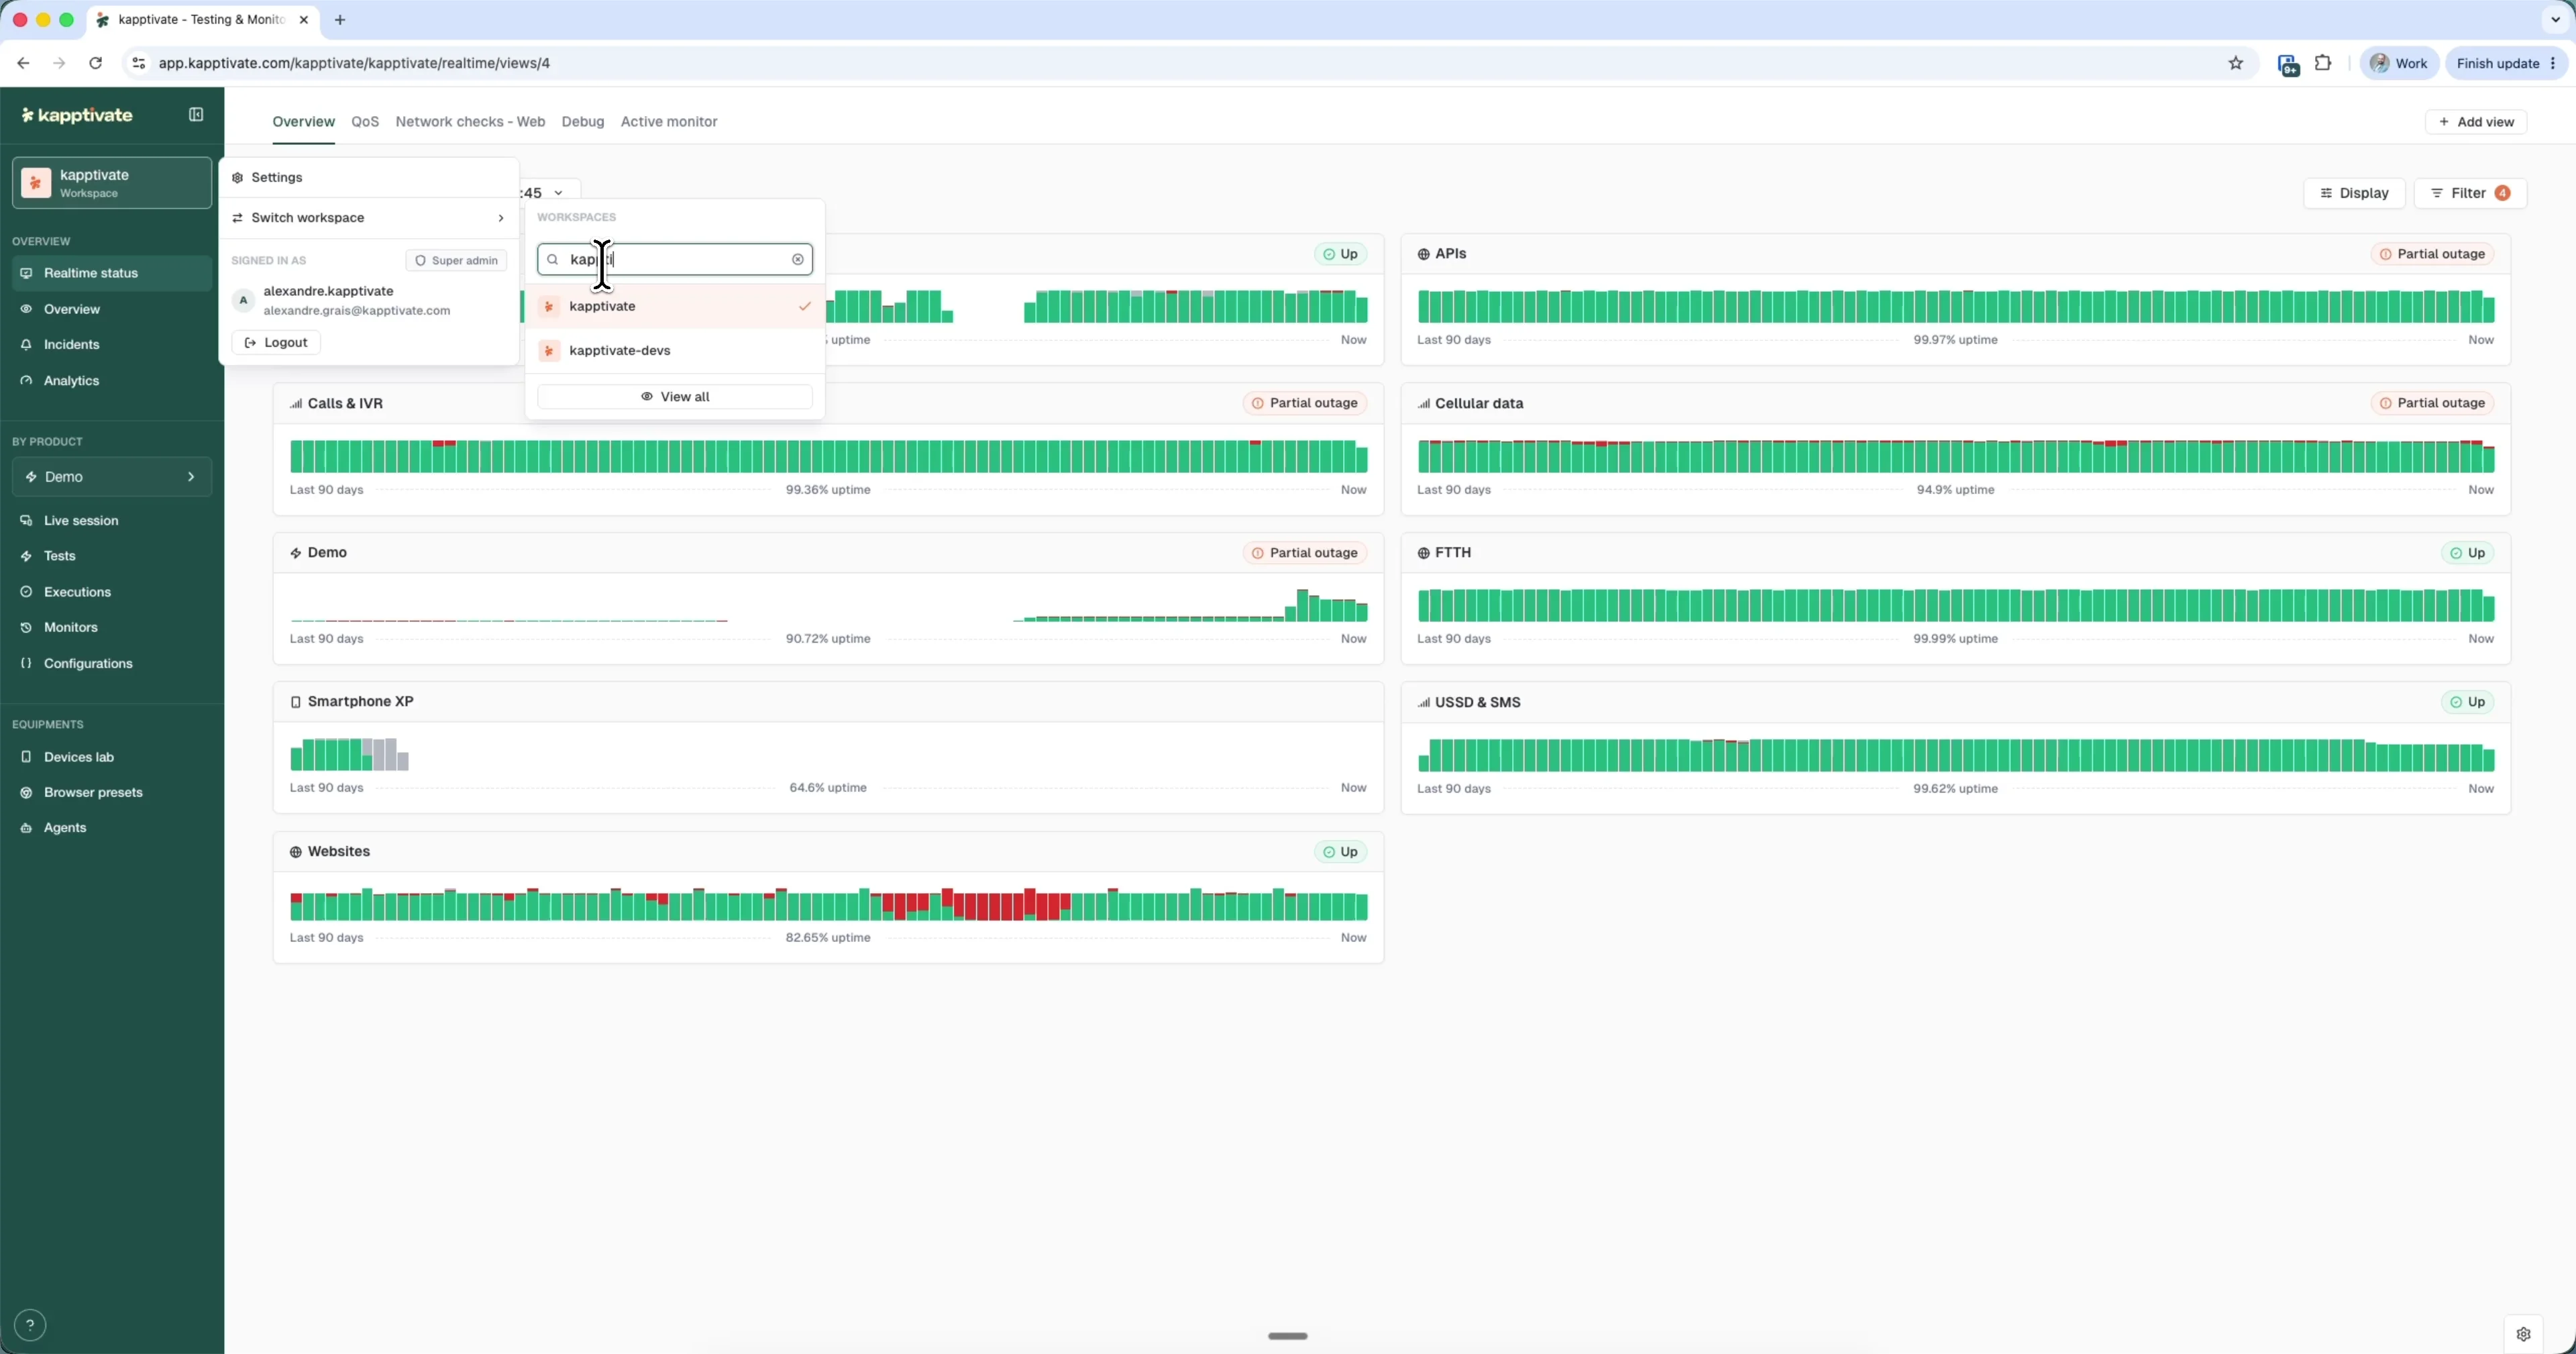
The sidebar
The left sidebar is your main navigation hub. Click the Kapptivate logo at the top to return home. It's organized into three sections: Overview, By Product, and Equipment.
Overview
Workspace-wide health and reporting:
- Realtime Status: see all monitors and their current health, and build detailed views of how your products are doing.
- Incidents: review every incident across your monitors, configure alerts, and see which alerts are currently active.
- Analytics: build custom or ready-made dashboards to explore the data Kapptivate collects, and schedule email reports and exports.
By Product
Everything scoped to a single Product. The Product Selector at the top lets you pick a Product space, the place that groups all the tests, variables, and executions for one product (an Apple mobile app, a website, and so on). A Workspace can hold several Products.
- Live Session: manually drive a smartphone, SIM, or browser device in real time.
- Tests: create and edit tests and test campaigns.
- Executions: see the results of every run carried out for this Product space.
- Monitors: create monitors, tests scheduled to run at a set frequency.
- Configurations: define environments, variables, and variants.
Equipment
Manage the hardware and browser setup behind your tests:
- Device Lab: manage your device lab and check the status of every SIM card and phone.
- Agents: view the agents that control your SIM cards, phones, and browsers, and check their status.
- Browser Presets: configure browser profiles, everything related to browser setup for web testing.
Switching Workspaces
Click the Workspace logo and name at the top of the sidebar to open the Workspace menu. It contains:
- Settings: open the current Workspace's settings.
- Switch workspace: expand the list of Workspaces you can access.
- Signed in as: the account you're logged in with, along with your role badge (for example, Super admin).
- Logout: sign out of Kapptivate.
Choose Switch workspace to see all Workspaces you have access to, sorted by active status and your default Workspace (marked with a star icon).
Search for a Workspace by name using the search box in the dropdown. Click any Workspace to switch to it.
If you have access to many Workspaces, click "View All" to see the full Workspace choice screen, which displays all active and archived Workspaces as large cards.
When you switch Workspaces, the platform preserves context where possible. If you are on a product-specific page (Tests, Executions), you are taken to the product choice screen to select which Product to work with next.
Switching and setting default Products
Below the Workspace selector, the sidebar shows a Product Selector in the "By Product" section. Click the Product icon and name to see a dropdown of all Products in the current Workspace, sorted alphabetically.
Click any Product to switch to it. The sidebar and all content will refresh to show that Product's tests, executions, devices, and configurations.
Set a default Product: in the Product dropdown, look for a pin icon next to a Product name. Click the pin to set that Product as your default for this Workspace. The next time you enter the Workspace, the platform will jump directly to your default Product instead of showing a choice screen. Each Workspace can have its own default Product.
Collapsing the sidebar
Click the chevron icon next to the Kapptivate logo to toggle the sidebar between expanded (full names and labels) and collapsed (icons only). When collapsed, the sidebar takes up less space, giving you more room for content.
Navigation icons remain visible at all times. Hover over an icon in the collapsed view to see a tooltip with the section or page name.
Page tabs
Some pages use horizontal tabs below the header to switch between sections without losing your place. For example, the Executions details page has tabs for Overview, Steps, Variables, Screenshots, and Video.
Tabs show icons and labels. Inactive tabs can be scrolled into view by clicking them or using horizontal arrow navigation. The active tab is highlighted with distinct styling.
If a tab is disabled (greyed out), hover over it to see why. For example, the Video tab might be disabled if no video was recorded for that execution.
Notes and tips
- Search and filter: use search boxes on Tests, Executions, and other list pages to narrow results by name, status, or creator.
- Breadcrumb navigation: collection and execution names appear in a breadcrumb trail at the top of detail pages. Click to navigate back to the list.
- Favorite tests: star a test to mark it as a favorite, making it easier to find frequently used tests.
- Keyboard shortcuts: press ESC to deselect multiple items in lists, or to close dropdown menus.
Last updated on